TomTom GO Manual - 3
TomTom GO Manual
Navigation
Navigate to...
Navigate to...
This is the simplest and most useful starting point in most situations.
Given your current GPS position, you can use this to navigate to any given
address, crossing, favorite location, Point Of Interest, and so on. Select
'Navigate to...'
![]() to bring up its
first options screen.
to bring up its
first options screen.
'Recent destination'
![]() is a
useful time-saver, displaying a list of addresses, Points Of Interest and other
destinations that you've used before.
is a
useful time-saver, displaying a list of addresses, Points Of Interest and other
destinations that you've used before.
'Address'
![]() displays the same
city/street grids that you used in ' Planning your first route ', so just choose your destination in the usual way. If
you're not sure of the exact street name to type in, note that simply entering
the city's name again (or using the 'City center'
displays the same
city/street grids that you used in ' Planning your first route ', so just choose your destination in the usual way. If
you're not sure of the exact street name to type in, note that simply entering
the city's name again (or using the 'City center'
![]() option,
described below) will get you to the geographical center of the city.
option,
described below) will get you to the geographical center of the city.
Choosing 'Home'
![]() here is quick and
obvious, though if you chose not to set a home location when setting up your
TomTom system then this may still be grayed out. For more on setting up a home
location, see 'Home preferences'.
here is quick and
obvious, though if you chose not to set a home location when setting up your
TomTom system then this may still be grayed out. For more on setting up a home
location, see 'Home preferences'.
Although you're going to be navigating to many places you don't know
well, there will also be a number of locations that you visit frequently and
that you want to be able to travel from (and to) without having to enter their
address details each time. These are your 'Favorites'. See 'Favorite locations' for more on setting these up. Use
'Favorite'
![]() to navigate to
such a location.
to navigate to
such a location.
Note: 'Favorite' will be grayed out and unavailable if you haven't set any favorites yet.
'Point of interest'
![]() is your way into
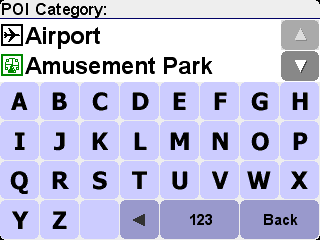
the huge database of railway stations, restaurants, gas stations, ATMs, and so on. Choosing this will display icons for the five categories
that you use most often. If the one you want now isn't shown here then use
is your way into
the huge database of railway stations, restaurants, gas stations, ATMs, and so on. Choosing this will display icons for the five categories
that you use most often. If the one you want now isn't shown here then use
![]() to bring up a browser with all categories that are available.
to bring up a browser with all categories that are available.

Use
![]() and
and
![]() to scroll through the list or enter a few letters of the required
category's name. When you see the category you want, select it, to bring up a
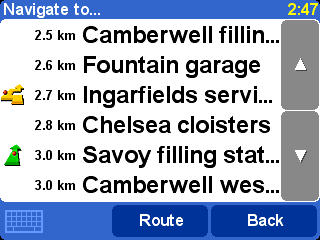
list of all Points Of Interest in that category, sorted according to
their distance from your current position. Use
to scroll through the list or enter a few letters of the required
category's name. When you see the category you want, select it, to bring up a
list of all Points Of Interest in that category, sorted according to
their distance from your current position. Use
![]() and
and
![]() to scroll through the list or, if you know the name of the Point Of
Interest you want, choose the keyboard icon
to scroll through the list or, if you know the name of the Point Of
Interest you want, choose the keyboard icon
![]() and then
enter a few starting letters.
and then
enter a few starting letters.

There are several icons used beside Points Of Interest in the
list. A straight green arrow means that the POI is on your route; a bent green
arrow means that a small detour from your route is needed to reach it; a bent
yellow arrow means that this POI needs a bigger detour from your route;
finally, with no icon shown, the POI is not on your route at
all.
Finally, select any Point Of Interest to make it your destination.
Tip: Some of the more specialized Point Of Interest categories (e.g. 'Place of worship', 'Theater') may contain information only for major cities.
By selecting
![]() in the 'Navigate to...' menu, you can view even more navigation options.
Choose 'ZIP code'
in the 'Navigate to...' menu, you can view even more navigation options.
Choose 'ZIP code'
![]() if you know this
information for your destination and would prefer to enter this than use the
town or city name. Once you've selected a ZIP code in the browser, you'll be
asked to choose a street name (if needed) and house number in the usual
way.
if you know this
information for your destination and would prefer to enter this than use the
town or city name. Once you've selected a ZIP code in the browser, you'll be
asked to choose a street name (if needed) and house number in the usual
way.
Tip: You can change your mind and start entering the town name after all. Or indeed start entering a ZIP code in the main Address browser. It really is up to you. Note that full ZIP code support is only available for the UK and the Netherlands.
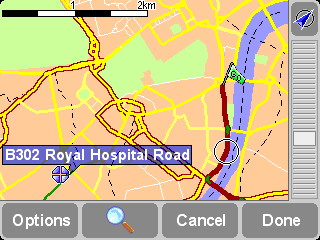
If you're good with maps and you'd prefer to pick a destination by eye,
or if you're simply not sure of a valid street name or ZIP code to enter,
choose 'Point on map'
![]() . You can then
scroll around the map, zooming in or out as needed. Finally, select a point on
the map as your destination and use 'Done'. For more information on using the
TomTom map browser, see the chapter on ' Maps '.
. You can then
scroll around the map, zooming in or out as needed. Finally, select a point on
the map as your destination and use 'Done'. For more information on using the
TomTom map browser, see the chapter on ' Maps '.

On TomTom GO or TomTom Navigator, you can 'drag' the map to
scroll it in any direction or drag the zoom control up or down to zoom out or
in. TomTom MOBILE users should use their D-pad and Enter keys.
When traveling into an unfamiliar city, you might not know a
destination road name, of course. Choose 'City center'
![]() to
automatically navigate to the geographical center of any city name entered in
the usual way.
to
automatically navigate to the geographical center of any city name entered in
the usual way.
In a similar way, choose 'POI in city'
![]() to navigate to
a Point Of Interest in an unfamiliar city (e.g. a Hotel or Parking Garage).
Choose a city name in the usual way and then a Point Of Interest category. The
possible POIs are automatically sorted by proximity to the center of the chosen
city.
to navigate to
a Point Of Interest in an unfamiliar city (e.g. a Hotel or Parking Garage).
Choose a city name in the usual way and then a Point Of Interest category. The
possible POIs are automatically sorted by proximity to the center of the chosen
city.

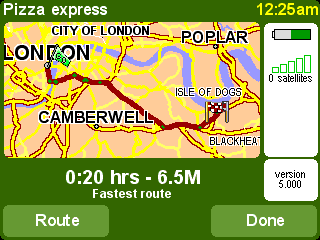
Once planned, a summary of the
calculated route is shown on a suitably scaled map. Select 'Route' to explore
the route in various ways. See 'Advanced route planning'
for more details.


